 |
|
|
|
 |
|
 |
|

|
|
|
|
|
|
|
|
|
|
|
|
|
|
| EZ Maintenance WEB™ |
|
Our Web version of EZ
Maintenance™, EZM Web™
is accessible anywhere in the
world there is an internet
connection.
|
| |
 |
| Partial Client List |
|
| EZ Maintenance™ for Windows
|
| EZ Maintenance™ for Web |
| |
|
|
|
| Features |
|
- Schedule All Maintenance
- Equipment & Vehicles
- Full Inventory Control
- P.O.s, RFBs, Invoices
- Work Orders, Bar Coding
- Emergency Work Orders
- Email Alerts
- QuickBooks Link
- Send Work To Vendors
- Customer/Vendor Tracking
- Track Customers
- Maintenance Histories
- Access Passwords
- Supervisory Control
- And Much More!
|
|
| Contact Information |
|
Pinacia Inc.
5699 Kanan Road, #349
Agoura Hills, CA USA 91301
Phone: (818) 396-8550
Sales Support: ext. 1
Tech Support: ext. 2
Fax: (818) 396-3524
info@pinacia.com
|
|
|
|
|
 |
Click here to see a video on Inventory Items.
|
| Setting up Inventory &
Purchasing |
This is the
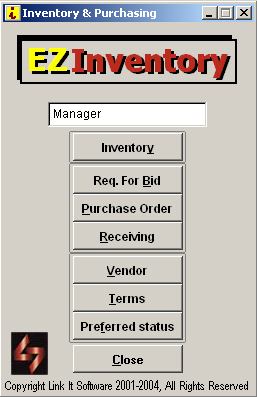 main menu of the inventory system. main menu of the inventory system.
The Inventory & Purchasing module of EZ Maintenance software allows
you to track and control all inventory, including minimum and maximum
reorder points, inventory levels,
inventory tracking, purchase orders, requests for quotes, vendors and
much more. The Inventory
& Purchasing module is designed so that
materials and parts used to complete work orders are automatically
deducted from inventory levels if you choose to allow such
deduction. The
Inventory module is also designed to allow an operator of EZ Maintenance
to issue a purchase order for more materials or parts directly from the
work order screen if needed.
In order for the Inventory & Purchasing module of EZ Maintenance fleet maintenance
software to function, basic information must be entered first.
|
 Clicking
on the Preferred
Status button from the main screen will bring up this window. This is where you will want
to enter your status designations for vendors. Clicking
on the Preferred
Status button from the main screen will bring up this window. This is where you will want
to enter your status designations for vendors.
Clicking New will allow you to type in a new item, and clicking Edit will allow you to change an
item.
The Print function is
designed to allow you to print out your list of Preferred Status
designations.
|
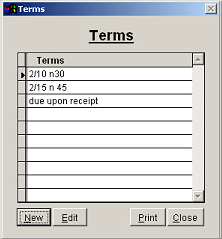 Clicking on
the Terms button will
bring up the following window. This
is where you will want to enter in all of the terms used by your various
vendors. Clicking on
the Terms button will
bring up the following window. This
is where you will want to enter in all of the terms used by your various
vendors.
|
|
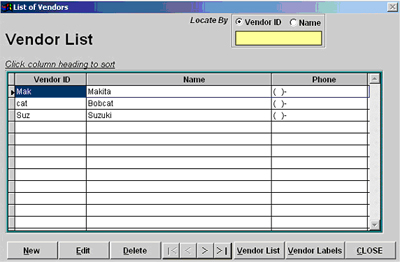
Clicking on the Vendor
button from the main screen of the Inventory & Purchasing section
will bring you to this List of Vendors screen.
From here, you are able to locate a vendor by Vendor ID or by Name and simply
typing in either one in the yellow box provided at the top of the
screen.
|
|
Also from this screen, you will enter in a list of your
vendors by clicking on the New
button, which will bring up the following screen: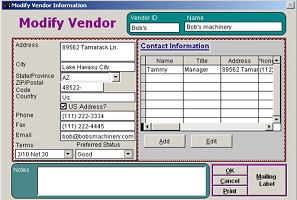
The Contact Information area is
designed to allow you to enter in additional contact information for the
vendor.
Mailing Labels for a particular
vendor can be printed from this screen at your convenience.
|
|
|
|
|
|
|
|


 Introduction